For the holidays, I’m recapping some of our favorite turkey leftover recipes. Remember, it’s easy to shred leftover meat in the Vitamix. I use shredded leftover turkey to make turkey sa…
Source: Turkey leftovers? No problem!
For the holidays, I’m recapping some of our favorite turkey leftover recipes. Remember, it’s easy to shred leftover meat in the Vitamix. I use shredded leftover turkey to make turkey sa…
Source: Turkey leftovers? No problem!
Filed under Healthful Eating
For a quick side dish, snap and string green beans while the water heats in your pressure cooker. Better yet, buy a package of ready-to-cook green beans. Toss them in with a package of cleaned, sliced mushrooms, and you’re minutes away from a delicious vegetable dish.
Green beans and mushrooms under pressure
Serves 4 — 6
Ingredients:
- 1 pound fresh green beans, washed and trimmed.
- 1 pound fresh sliced and cleaned white mushrooms
- 1 clove garlic, pressed or grated
- ½ tsp. Kosher salt or pink Himalayan salt
- ¼ tsp. fresh ground pepper
- 1 cup water
- (optional: ¼ cup chopped onion and ¼ cup chopped sweet pepper)
Directions:
- Add water to the pressure cooker and preheat.
- Add beans and mushrooms to the pot.
- Cover the beans and mushrooms with the garlic, salt, and pepper. (Add chopped onion and pepper if desired)
- Secure lid to pressure cooker. Bring to pressure.
- Cook two minutes, remove from heat, and immediately quick-release pressure (Be careful! The steam can burn).
- Using a slotted spoon, move the beans and mushrooms dish to a serving bowl. Serve immediately.
For more tender beans, allow the pressure to drop on its own five minutes before releasing.
Filed under cooking, Healthful Eating, Vegetables
I resisted purchasing an air fryer for about two years. While friends, acquaintances, and infomercials assured me I would use one, I resisted. We don’t eat a lot of deep-fried foods, so why bother?
But curiosity overcame my objections and I purchased one, a GoWise USA 3.7 quart model. Then I began my tests.
First, I picked up fresh catfish fillets at my local Publix. I washed my new electric air fryer according to the instructions and sprayed Pam in the basket. After dipping the catfish in egg and then a light coating of flour/cornstarch, I placed the fillets in the basket of my electric air fryer. I selected the Fish setting for 20 minutes. After 10 minutes, I gently turned each fillet to ensure even browning. My husband and I enjoyed catfish fillets that tasted deep-fried! So far, so good.
Next, I cooked a frozen hash brown patty on the Fries setting for 6 minutes, turning the patty after 5 minutes. Perfect! Better than any fast-food breakfast hash brown patty because it wasn’t greasy.
I cooked frozen, breaded veal cutlets (from Omaha Steaks) on the Chicken setting for 20 minutes (again, turning at the halfway point) for veal Parmigiana. As good as any restaurant!
Frozen french fries were the best, and took only 15 minutes for shoestring-size fries. After about 8 minutes, I shook the basket to expose all sides evenly. Better than our favorite burger chain because there’s no grease!
Finally, I tried kale. I’ve always wanted to try making kale chips but just didn’t feel like heating up the oven. The electric air fryer acts as a mini-convection oven, and will make any vegetable into a chip with nothing more than a spray of Pam. Kale chips took 20 minutes at 320 degrees. It doesn’t cook a lot at a time, but that’s no problem since I’m the only one in my household willing to eat kale chips. 😉
According to Harlan Fowler, author of the GoWise USA Air Fryer Cookbook, regular bacon cooks well–very crisp, but it leaves a puddle of rendered fat in the pan. (Not a bad thing if you need rendered bacon fat for a recipe, but messy for cleanup). Yet the instructions state to avoid greasy foods like sausage (and bacon qualifies), so I won’t be trying bacon in my air fryer.

I have more testing to do, but I already know this purchase will work for me. The electric air fryer is a welcome addition to our kitchen.
Filed under Healthful Eating
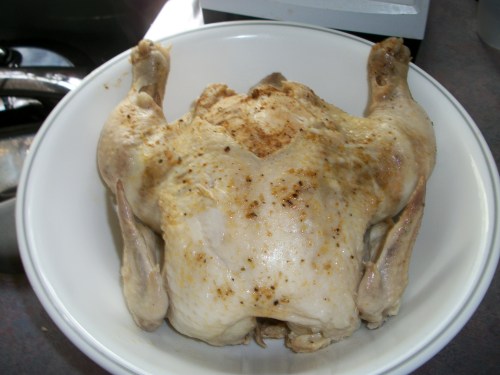
I previously posted an oven chicken recipe to make your own rotisserie chicken without a rotisserie. I’ll show you an alternative to that recipe using the pressure cooker.
Note: If you eat the skin of a chicken, you’ll want to brown it first using either the broiler or a large skillet. I skin chicken before eating it because skin is loaded with saturated fat, so browning isn’t an issue for us.
Hasty Tasty Roast Chicken
Ingredients:
- 1 whole fryer, approx. 3 lbs.
- 2 Tbsp. olive oil
- 1 tsp. Kosher salt
- ½ tsp. fresh ground pepper
- ½ tsp. cayenne pepper
- ½ tsp. dried thyme
- ½ tsp. garlic powder
- ½ tsp. smoked paprika
- ½ tsp. onion powder
- 3 cups liquid (water, stock, broth)
Directions:
- Rub whole chicken with the olive oil.
- Combine all spices and rub into the chicken. If possible, loosen the skin and rub the seasonings directly onto the meat.
- Add liquid to bottom of a pressure cooker pot. Place a rack in the bottom to prevent the chicken from resting directly on the pot.
- Secure lid to pressure cooker and bring to pressure. Cook for 20 minutes. If using an electric pressure cooker, select the Poultry setting for 20 minutes. (If chicken is frozen, you’ll need to add 10 minutes)
- Remove from heat (or hit “cancel” on the Keep Warm button) and allow pressure to drop on its own (about 10-15 minutes).
- Carefully open cooker. Use a meat thermometer inserted at the thigh to check for doneness. The chicken’s internal temperature should be at least 160°F (residual cooking will bring it to about 170°F).
- Using tongs or meat forks, move the chicken to a carving platter or large bowl or platter. Tent with aluminum foil and let the chicken rest for 5-10 minutes.
- Carve and serve.
BONUS: Don’t discard the cooking liquid. It’s rich in flavor. Strain and use to make a quick gravy. Save in the refrigerator or freezer for later use. Or strain, return liquid to the pressure cooker, and cook vegetables in it.
Filed under chicken, cooking, Healthful Eating, kitchen equipment, poultry